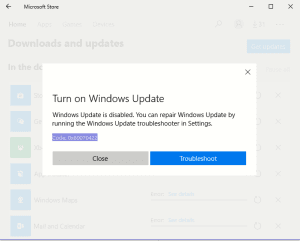
The error code 0x80070422 is one of the windows update errors which does not let you update the new version of Windows. These sorts of errors are easy to solve. If the same error is popping up on your computer screen, Welcome! You are at the right site. You can fix this error code 0x80070422 in the following ways.
1. You should make sure that the Windows update service is running
Firstly, you have to make sure that the Windows update service is are enabled on your computer. You can follow these simple steps to enable the Windows update service.
- Enter the Windows key + R key in order to open the Run Command Box.
- You have to type Control Panel in the Open box of the Run command box and hit enter.
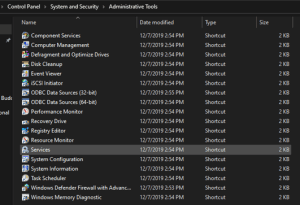
- Now, you should navigate Administrative Tools and click on Services.
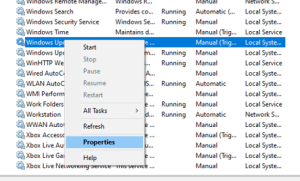
- A new window called services will appear on your screen. You should find the Windows update inside the list of services, right-click on it, and select properties.
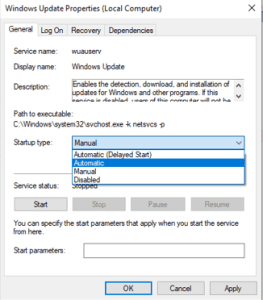
- Inside the properties, you have to find Startup Type and choose Automatic from the dropdown menu.
- If it is not running, you should click on the Start button in the same section and start it.
- Finally, you have to click on OK to save the settings.
You should restart your computer and check whether the error is fixed or not. If the error 0x80070422 is not fixed, you have to try another method to fix this error.
2. You need to restart Network List Service to fix the error
Network list service can be found in the services window. You can follow these simple ways to reach to Network list and restart it.
- At first, press Windows key + R key which leads you to Run Command Box.
- You should type services.msc inside the open box of the Run Command Window and hit Enter or click on OK.
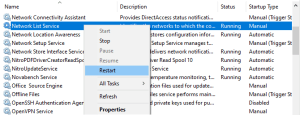
- The services window will appear on your computer screen. You should find the Network List service, right-click on it and select Restart.
After that, you can close that particular window and try updating your windows.
3. You should disable IPv6
This method of solution seems awkward but many users have got positive results using this method of solution. To disable IPv6, you can follow these methods of solution.
- You should right-click on the start menu which is situated at the left-bottom of the screen and select the Control panel.
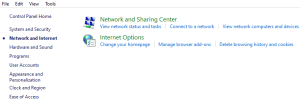
- After reaching to control panel, you have to go to Network and Sharing Center.
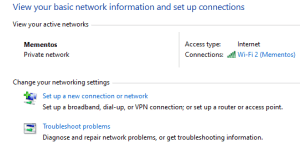
- Now, you need to find your connection, right-click on it, and select properties.
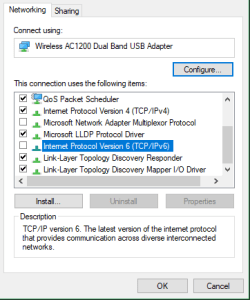
- You can see the list of items. After that, you have to find the Internet Protocol Version 6 (TCP/IPv6) and unmark it.
- Finally, restart your computer.
Further, after completing these steps, you have to check whether the error 0x80070422 is fixed or not.
4. You have to check EnableFeaturedSoftware Data
Follows the steps listed below to check EnableFeaturedSoftware Data.
- You need to open Run Command Box by pressing the Windows key + R key.
- Then, type Regedit inside the open box of Run Command Box.
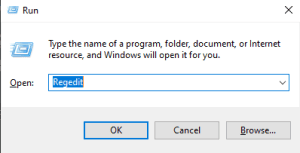
- You should follow the following path at the left part of the Registry Editor Window.
HKEY_LOCAL-MACHINE > SOFTWARE > Microsoft > Windows > CurrentVersion > Windows Update > Auto Update
- At the right part of the Window, you can check EnableFeaturedSoftware Data and make sure its value is set to 1. If it is not set to 1, you should set it to 1.
If the error is not fixed, you should try another method to solve the error 0x80070422.
5. You have to run the Windows 10 troubleshooter
The next step is to use windows Troubleshooter which may help you. You can follow these simple steps to use Windows troubleshooter.
- First, you need to go to the query menu by pressing the Windows key + Q key and searching out for Windows Update Troubleshooter.
- Then, you have to start running by pressing the Windows key + R key.
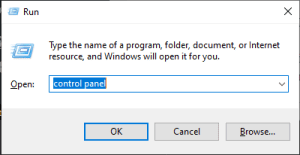
- Now, you should type the control panel in the open box of the run window.
- It will open the Control Panel window. Then you should select the System and Security option of the control panel window.
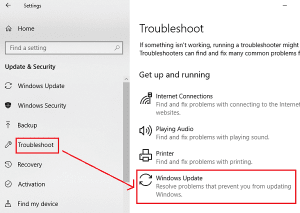
- Now you need to select the update troubleshooter.
- Then you have to click on the option Fix problems with Windows update.
- You should find out and click on the Advanced tab option in the window.
- Now you need to left-click on the Run as administrator option.
(Note: You need to make sure that you have clicked on the Apply repairs automatically option)
After the completion of these steps, you can find that the troubleshooter automatically starts to scan to recognize errors with your system updates. You have to wait for some period of time patiently to complete as it takes several minutes to complete.
We hope, this article helped you to fix your error code 0x80070422.
