If you are trying to install or update windows 10, error 0xc1900101 popped out. You are not alone to face this error. Now don’t worry, we help you to fix this error. This is the most common error while installing/updating the windows. These errors are not difficult to fix. You just stick with us till the end of this article. You’ll get your error fixed.
These types of errors mostly occur during the installation of windows or updating windows. These types of errors are mostly driver errors. You can follow the simple steps to fix this error. You can only get this kind of error in windows 10, these types of errors don’t apply in another version of windows. Those common errors are listed below with steps for fixing the error code.
- 0xC1900101 – 0x2000c
- 0xC1900101 – 0x20017
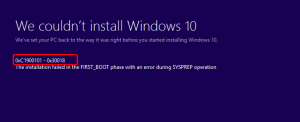
- 0xC1900101 – 0x30018
- 0xC1900101 – 0x3000D
- 0xC1900101 – 0x4000D
- 0xC1900101 – 0x40017
Steps to Fix the Windows Error Code: 0xC1900101
1. You should check the free space of the system before installing/updating windows:
You need at least 16 GB of free space to install 32-bit OS. Similarly, your device needs 20 GB of free space to install 64-bit OS. If you don’t have enough space, free up the space of your device and try it again.
2. You should try running windows update for few times:
You should download and install windows update for few times. It includes any software update/hardware updates or any other third-party drivers.
3. You can use any third-party software to proceed:
You can use many types of third-party drivers to fix this error and proceed with the installation of windows. If you do not have time to follow other steps to fix this error or your knowledge of computers is not enough to perform other steps, some of the drivers are designed for users like you. Those drivers fix your problem automatically and proceed with your windows installation process. You can find various drivers like ‘TweakBit Driver Updater’, ‘Driver Easy’, and so on. There are some simple steps to use ‘Driver Easy’. The process of using these drivers is almost similar.
- First of all, find the trusted source and Download ‘Driver Easy’.
- After that, install it.
- Once you installed this driver, it will automatically start scanning for outdated drivers on your PC. You need to wait till the scanning completes.
- After completing the scan, you can select whether you want to update the driver one at a time or all at once.
- After updating outdated drivers, error 0xC1900101 may be fixed.
4. You should remove the problematic applications:
Some third-party applications may be a hindrance to the upgrade process and cause the error 0xC1900101. Most users reported that applications like Acronis True Image and Trusteer caused these kinds of errors. After removing these sorts of applications, you can proceed to upgrade. Make sure that these sorts of applications are completely removed from your computer. Many users found that after removing these sorts of applications the error was fixed.
5. Remove unused hardware devices:
You can remove the hardware devices which are not essential for the basic functioning of the computer. If there is some unused hardware connected to your pc, then it may be a hindrance for installing or updating windows 10. Many people have got this problem fixed by unplugging hardware devices. It may not sound appropriate solution for fixing this error, but you must try it as many other users have got their problem fixed by unplugging hardware devices.
6. You should remove extra RAM or network card:
The error 0xC1900101 and mainly error 0xC1900101-0x20017 is caused by the addition of RAM or any extra network card. You can proceed by removing an added RAM. You should not remove the stock RAM of your computer. Some of the users also have spotted that network cards also interfere to fix these kinds of errors. They also reported that they got their error 0xC1900101 fixed by removing the network card from their computer.
7. You should try running an SFC scan:
Sometimes corrupted system files may be responsible for the cause of this error. You can easily debug this by following the steps below.
- You should go to the start menu.
- Search for the command prompt in the search bar.
- Right-click on the command prompt from the list of results and select run as administrator.
- Now type ‘SFC/ scannow’ and hit enter.
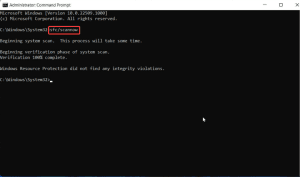
- The process will start automatically.
8. Go to device manager and check for hardware errors:
There are some simple steps to go to the device manager and check the hardware errors.
- You can click on the start menu.
- Now you can go to the search bar and type ‘device manager’ in the search bar.
- You can click on ‘device manager’ on the list of results.
- Now you got access to your device manager.
- You may see some yellow exclamation mark ‘!’ at the rightmost side of some hardware. It means that you have a problem with those hardware devices with a yellow exclamation mark.
- You can right-click on those device names and select either update driver or uninstall.
9. You should remove third-party security software:
Antivirus software can also cause this kind of errors. You can also disable your antivirus temporarily to check whether the error is caused by antivirus software or not. You can also uninstall the antivirus software to check whether the problem is with antivirus or not. Before uninstalling the antivirus software, make sure that you can install that program again after fixing the error. If you are using windows 10, then you should not install any third-party antivirus software. Be sure that Windows defender will be there to protect your pc.
In some cases, you may be required to remove all the files and registries related to your antivirus. For this case, you may find the uninstalling tool for removing your antivirus completely. Almost every antivirus maker offers a tool for removing the antivirus completely. Be sure that you download the uninstalling tool for your antivirus. If the removing tool is for another antivirus, it may not work for your antivirus.
10. You should disable the LAN card in BIOS:
In some cases, the main cause for this error is a wireless adapter, but sometimes an ethernet adapter can be the cause of this error. You can follow the following steps to disable LAN.
- Go to the start menu and click on settings.
- Click on recovery and select restart now.
- After the computer restarts, a menu will appear there then click on Troubleshoot icon.
- Then click on Advanced options and choose UEFI Firmware Settings.
- Now you got access to BIOS settings.
- Go to Onboard LAN.
- Finally, disable it.
11. You should upgrade your BIOS:
The error 0xC1900101 can also be fixed by upgrading BIOS. An outdated BIOS may have interfered with installing the windows. Many users found that upgrading BIOS solved their problem, so you may try upgrading your outdated BIOS to fix this error. You must be sure that upgrading BIOS is a dangerous upgrade. It can damage your PC. That’s why you should proceed properly while upgrading your BIOS.
12. You should repair the hard-drive error:
These are the simple steps to repair the hard-drive errors.
- Go to the Start menu to proceed.
- You should search for the command prompt in the start menu.
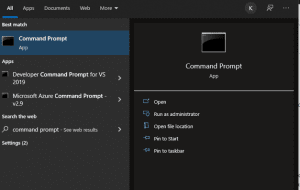
- You should choose the command prompt from the list of results.
- After opening a command prompt, you should type “chkdsk/f C:” in the command prompt.
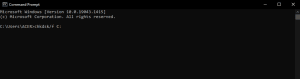
- After typing and pressing enter key, the repair will start automatically.
- You will be asked to restart your computer after the completion of the process.
13. You should restart your pc cleanly:
You should not restart your pc immediately by using any external buttons or unplugging your pc. After that, you can start the windows installation process.
Though this error 0xC1900101 is one of the serious errors, it can be solved easily by following one of our solutions. Though it can prevent you from installing some updates, you should be able to fix this error now.