
Wireless Fidelity popularly known by the short name WI-FI is a technology that allows electronic devices such as PCs, mobiles, tablets, Smart TVs to wirelessly connect to the internet or LAN within its range. For wireless devices such as Laptops, mobiles, tablets Wi-Fi technology is a must nowadays. In this article, we are discussing Windows 10 Wi-Fi, its settings, features, and problems related to it, and also give an effective solution to fix those problems.
Before we talk about Windows 10 Wi-Fi problems, let us go through how to add or remove Wi-Fi in Windows 10 and other Windows 10 Wi-Fi settings. Most of the small problems related to Windows 10 Wi-Fi is due to less knowledge of Windows 10 Wi-Fi setting so during the discussion about Windows 10 Wi-Fi you may find what is going wrong and fix the problem easily.
Adding Wi-Fi Adapters/Drivers and Fixing no Wi-Fi Issue
If you haven’t installed a Wireless Networks driver, first you need to install a wireless network driver for your computer. These drivers are easily getable from the official website of the brand of which computer device you are using. If you have upgraded to Windows 10 from authorized Windows 7 or Windows 8.1 OS, you should not have a problem with Wi-Fi adaptors or drivers. But in some minor cases, users complained that they are not being able to add a Wi-Fi connection after upgrading to Windows 10. According to Microsoft Inc., it is due to having unsupported VPN settings or old VPN software installed in your PCs.
Probable Solution
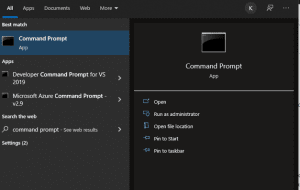
Step 1: Launch Command Prompt(Admin); Press Windows+X and choose Command Prompt(Admin)
Step 2: Copy and Paste following line and press enter.
reg delete HKCR\CLSID\{988248f3-a1ad-49bf-9170-676cbbc36ba3} /va /f
Step 3: Again, Copy and Paste following command and press enter.
netcfg -v -u dni_dne
Step 4: Restart your computer, you should be able to view the Wi-Fi networks and connect to them easily.
How to Add or Remove Wi-Fi in Windows 10
After installing and configuring Wi-Fi drivers/adapters you will see the Wireless Networks icon in the system tray located at the right corner of the taskbar.
To add Wi-Fi networks and connect to them,
- Click on the wireless networks icon in the system tray
- You will be shown a list of available wireless networks, choose the wireless network you want to get connected
- If you will be using the same network frequently don’t forget to tick on Connect Automatically click on Connect.
- Type Network Security Key and click Next and complete the configuration to be connected with Wi-Fi.
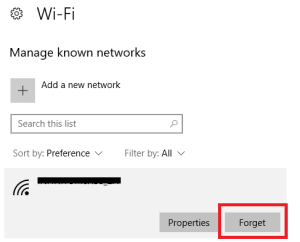
To remove or forget Wi-Fi networks,
- Click on the wireless network icon in the system tray
- After that, click on Network Setting just below the list of available wireless networks
- Click on Manage Known networks
- Then, click on the Wi-Fi you want to forget or remove and click on Forget button.
WI-FI Sense
Wi-Fi sense is Microsoft’s created technology that enables Windows 10 OS users to share Wi-Fi network access to their Facebook, Outlook, and Skype contacts. Originally Wi-Fi sense feature was first used in Windows 8.1 Mobile that made the jump to Windows 10 OS for PCs and tablets. If you have enabled the Wi-Fi sense, it continuously works in the background and automatically connects to the Wi-Fi networks shared by your contacts. And your contacts will also be able to connect to your Wi-Fi network in a similar manner.
Looking at the features that it possesses, it seems to be a very useful feature that can make our life easier, saving our cellular data while we are outdoor. But the response it got from the users and experts was not as expected by Microsoft. Due to its working mechanism, it made users and experts think that Wi-Fi sense was not secure and could share Wi-Fi password and login information to shared contact and also may cause leakage for private information which was quoted completely wrong by Microsoft.
Due to its low usage and low demand, in Windows 10 anniversary update Microsoft eventually removed the Wi-Fi sense features that allowed users to share Wi-Fi networks with their contacts and also be connected with the Wi-Fi networks shared by their contacts in a similar manner. You can still use some of the striped features of Wi-Fi Sense in Windows 10 anniversary update but you can’t use Wi-Fi sense like as before in the latest version of Windows 10.
How to Use the Wi-Fi Sense Feature to Automatically Connect to Open Hotspots
Wi-Fi sense is nevertheless a useful feature of Windows 10 putting its drawbacks aside. While other users will be looking for the open hotspot to be connected with the internet, their Wi-Fi sense feature in Windows 10 will use the previously collected information making the ‘Searching and Connecting’ process a lot quicker.
To be able to use this exciting Windows 10 feature you need to enable Wi-Fi sense from Windows 10 setting app.
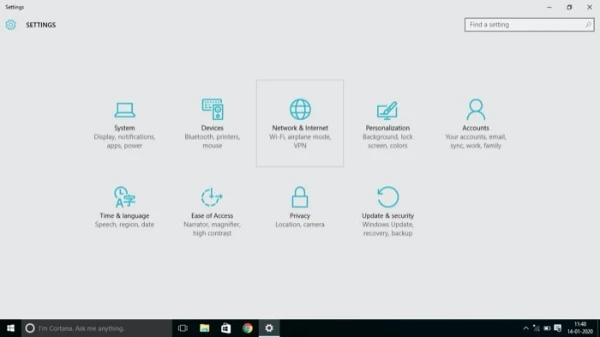
- Start by opening the Windows 10 Settings app, go to Start Menu and click on Setting Icon at the left corner of Start Menu or press Windows+I key to directly access the Setting app.
- Click on Network & Internet icon.
- Choose the WiFi option at the left panel of the current window.
- Under Connect to suggested hotspots turn on the button.
Now you will be able to use the stripped feature of Windows 10 WiFi sense and quickly be connected to suggested hotspots by WiFi sense.
Common Windows 10 Wi-Fi Connection Problems and its Possible Solutions
Once connected, if the Wi-Fi password is changed, it doesn’t ask new password and it won’t connect
When the password of Wi-Fi is changed, Windows 10 still tries to authenticate that particular Wi-Fi network with the same old password that has been already changed. Hence Windows fails to connect to that Wi-Fi network and shows errors without showing any notice about the password change. To solve this issue you can manually choose to forget the Wi-Fi network and reconnect it with a new password.
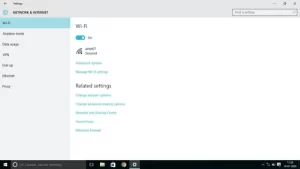
- Open the Windows 10 Setting app, press the Windows+I key on the keyboard
- Click on Network & Internet icon.
- Click on the Wi-Fi option. (You can access this setting directly by clicking on the Network icon at the taskbar tray and choosing Network Setting)
- Click on Manage known networks.
- Choose the Wi-Fi network you want your PC to forget and Click on Forget.
Now, you can enter your new password and connect your PC to the Wi-Fi connection.
Windows 10 Wi-Fi Connected but no Internet
Another widely reported Windows 10 Wi-Fi problem is that Windows 10 Wi-Fi is connected but there is no internet. Windows 10 requires the latest and updated network drivers for the smooth functioning of Wi-Fi and another wireless network. Using outdated network drivers results in a slow internet connection or no internet connection even when the Wi-Fi icon shows you are connected to the network.
Check out the following probable solutions to fix this connection problem
- At first, be sure that the problem is not due to the router or ISP
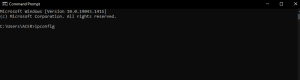
- Open Command Prompt(Admin), right-click on the Start menu and click on Command Prompt(Admin).
-
- Type ipconfig in the command prompt and press Enter.
-
- Search for the IP address listed just next to the Default Gateway. E.g. 198.168.100.1
Now type ping <Default Gateway> and press enter.
If the ping is successful but still you are not able to connect to the internet then you might need to consult with your Internet Service Provider(ISP).
- Update/install the Network adapter driver
- Open Device Manager, Type Device Manager in Cortana or Taskbar Search box.
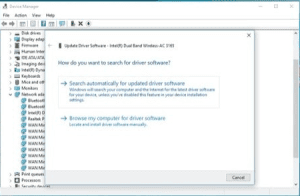
- From the list of all the available devices choose the Network adapters option and click on the network adapter installed on your PC.
- Right-click on the network adapter and choose Update Driver Software…, Click on Search automatically for updated software, or choose to Browse my computer for driver software and locate the path if you have already downloaded the updated driver software.
-
- If you choose Search automatically for updated software follow the steps and close the wizard after complete installation.
- After the installation, Restart your PC and check the status of your Wi-Fi if it is fixed.
- Choosing to Browse my computer for driver software to install the driver manually,
- Click on Browse and select the location of the file where it is saved and click Ok.
- Now after browsing the path of the driver file, click Next.
- Follow the steps and complete the installation.
- Restart your PC and check if the Wi-Fi issue is fixed.
- Run Network troubleshooter
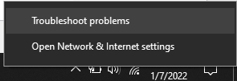
- Right-click on the Network/Wi-Fi symbol at the taskbar tray, Choose to Troubleshoot problems, and click it.
-
- The troubleshooting wizard will scan for possible errors in Network components that are causing the connection issues and automatically try to solve the issue(might ask permission of Admin for the sensitive task).
Run these networking commands in Command Prompt(Admin) window
- Right-click on the Start button and choose Command Prompt(Admin), click it, and run these following networking commands in order as listed below.
- Type netsh winsock reset in Windows command prompt and press Enter.
- Then, type netsh int ip reset in Windows command prompt and press Enter.
- Type ipconfig /release in Windows command prompt and press Enter.
- Again, type ipconfig /renew in Windows command prompt and press Enter.
- Type ipconfig /flushdns in Windows command prompt and press Enter.
- Temporarily turn off Firewall and any other antivirus/antimalware software
Check out the password when you are connected to any Wi-Fi network:
If you are connected to wifi but don’t know the password, don’t worry we have a solution for you. You can follow the following steps to know the wifi password which is connected to your pc.
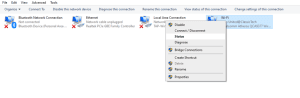
- You should right-click on the network icon on your taskbar.
- After that, you should choose Open Network and Sharing Center.
- The new window will pop up, you should go to Change adapter settings.
- Now go to your wifi connection and select wireless properties.
- Go to wireless properties.
- Open security tab among two tabs.
- Mark the check box of Show Characters.
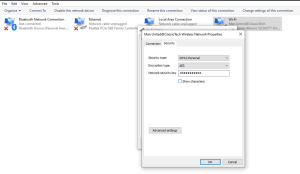
Now you can see the password of the wifi you are connected with.
Therefore, we hope this helped you to fix windows 10 Wi-Fi problems.